Twingate Client Logs
Last updated: April 3, 2026
Applicable to:
- Twingate Component: Client
- Platform: Android, iOS, Linux, macOS, Windows
Overview
This article will provide guidance for how to collect the Twingate Client logs across the various supported operating systems.
📣 Before uploading logs, ensure that "Collect Detailed Logs" is enabled. If it is not already enabled, follow the steps below to activate detailed logging. After enabling it, you will need to reproduce the issue again before proceeding with log upload or manual log collection, as enabling detailed logs is not retroactive.
To enable detailed logs for macOS/Windows:
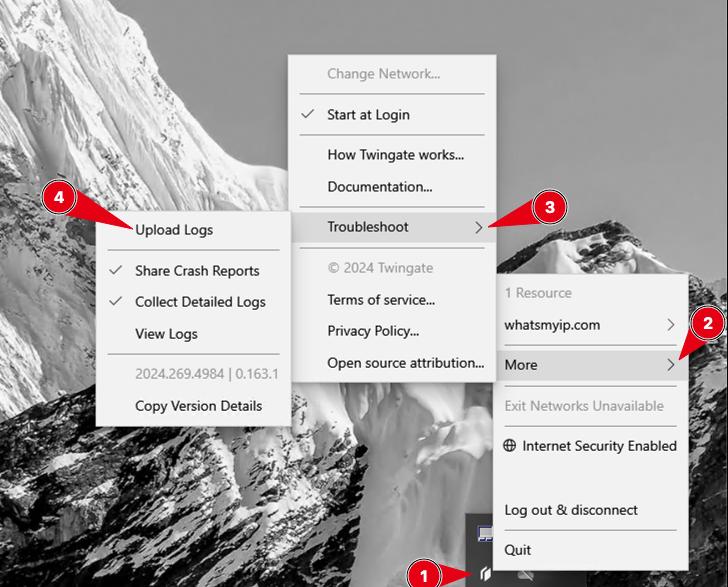
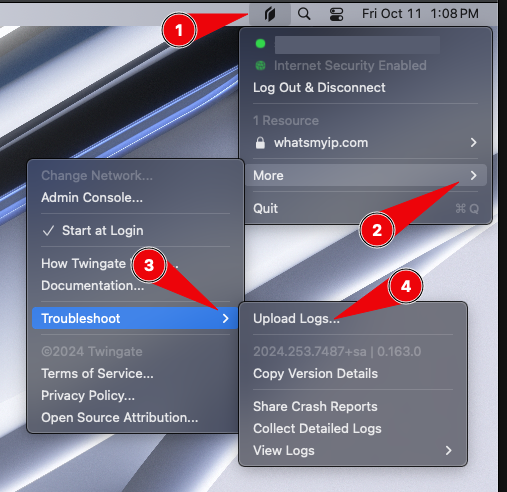
- Click on the Twingate icon in the system tray.
- Select More > Troubleshoot.
- Verify that a checkmark is displayed next to Collect Detailed Logs.
To enable detailed logs for iOS:
- Tap on the gear icon / user initials.
- Enable Collect Detailed Logs.
To enable detailed logs for Android:
- Tap the Settings "burger" icon in the top left.
- Under Advanced, enable Collect Detailed Logs.
Method 1. Client Log Upload (Windows and Mac - preferred)
- Via the Twingate Client, click More > Troubleshoot > Upload Logs...
Windows:
Mac:
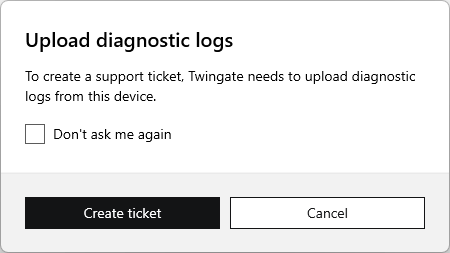
- At the Upload Diagnostic Logs prompt, click Create Ticket to approve the upload of diagnostic logs from the device.
-
A browser window will open for you to enter the required information. Enter your existing ticket ID in the Existing Support Request ID field. Please note, this is an unmonitored ticket queue, so ensure you have an active support ticket for reference.
For Admins: If you do not have a ticket yet, first create one by visiting help.twingate.com and clicking the Open a Support Request button. Follow the prompts to retrieve your ticket ID, then enter it on the Upload Logs page to link your logs to the ticket.
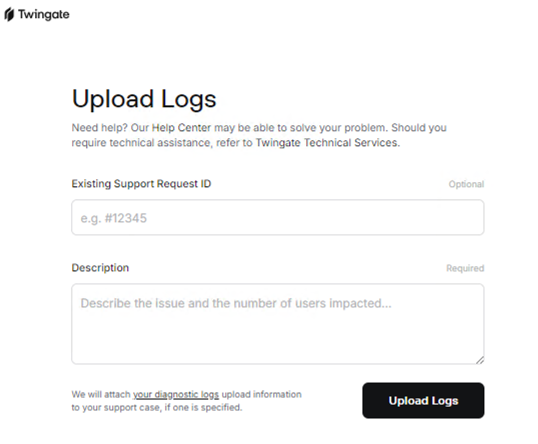
- Fill in your existing ticket ID, description, and click Upload Logs.
Method 2. Manual Retrieval (Windows and Mac)
Click on the Twingate icon in the taskbar, then...
-
On Windows
Select More > Troubleshoot > View Logs:
- Two Explorer windows will open
%LOCALAPPDATA%\Twingate\logs\%PROGRAMDATA%\Twingate\logs\
- Logs should be compressed and uploaded to the existing support request.
-
On Mac
Select More > Troubleshoot > View Logs > Finder: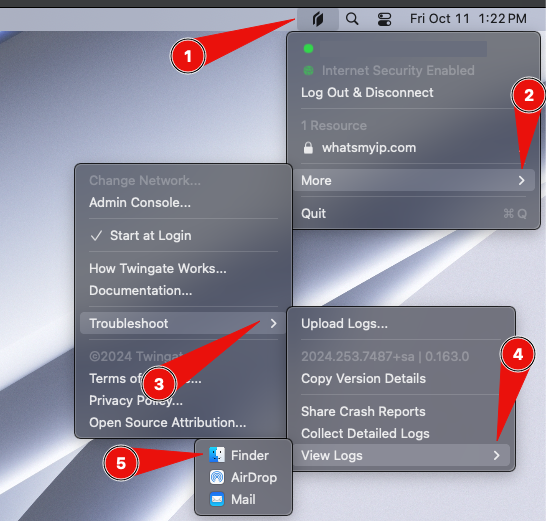
- This opens Finder to the log directories defined below, depending on installation method of App Store or standalone.
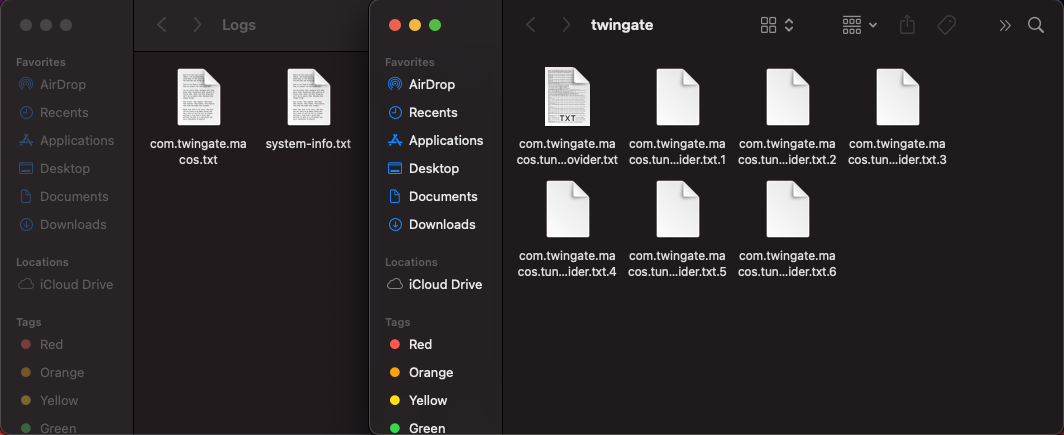
- macOS App Store Client~/Library/Group Containers/group.com.twingate/Logs/) in Finder.
- macOS standalone Client~/Library/Group Containers/6GX8KVTR9H.com.twingate.com/Logs//private/var/log/twingate/
- Logs should be compressed and uploaded to the existing support request.
Linux
Before retrieving logs, ensure that debug logging is enabled. To check and set the logging level to debug, follow the steps below. After enabling debug logging, reproduce the issue again, and then proceed to generate the log bundle. Note that debug logging is not retroactive, so you must reproduce the issue after enabling it if it was not already active during the initial log collection.
To check the current logging level, run the following command in your terminal:
sudo twingate config
Look for the log-level setting in the output. If the logging level is not set to debug, you can enable debug logging by running the command:
sudo twingate config log-level debug
After enabling debug logging, the Twingate Client must be restarted for the changes to take effect. To do this, run the following commands sequentially:
-
twingate stop– This stops the Twingate Client. -
twingate start– This restarts the Client with debug logging enabled.
Once the Client has been restarted, you can reproduce the issue and then proceed with log collection.
Sending Logs to Support
-
When capturing logs to send to our support team, use the command:
sudo twingate reportThis command will create a ZIP file containing diagnostic information, which will be saved in the current working directory. Once the ZIP file is generated, it can be attached and sent to our support team for review.
In cases where journalctl is not installed (which may occur when running the Linux Client in a container or headless mode), logs will be saved in the following location:
/var/log/twingated.logMake sure to retrieve the logs from this file if journalctl is unavailable.
Self-Service Reading Logs
- For live review of logs, the Linux Client runs as a systemd service with logs retrievable via journalctl. Below is an example command:
sudo journalctl -u twingate --since "1 hour ago"
iOS
- When not logged in: within the Twingate app, tap on the Settings gear icon at top right and tap Share with Developer > Save to Files > Attach each file to your open ticket.
- When logged in: within the Twingate app, tap your Profile image > Share with Developer > Safe to Files > Attach each file to your open ticket.
Android & ChromeOS
- Within the Twingate app, tap the Settings "burger" icon in the top left, and under Advanced, tap Share Logs with developer.